How to Repaint Your Trim Like a Pro

Your trim adds a beautiful finishing touch where the floor meets the wall—but let’s be honest, it takes a serious beating! Between kids kicking it, the dog chasing a ball, and the constant wear from vacuums and mops, it’s no surprise your trim starts to look rough. The good news? There’s not much you can do to prevent the wear and tear, but you can fix it—and that’s where repainting trim comes in.
If you're not ready for a full repaint, touching up those hardest-hit areas can make a big difference in how fresh and clean your home looks.
What You Need for Repainting Trim
Here’s a handy supply list to get started on your trim repainting project:
-
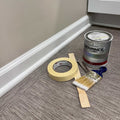
Good quality paint in a satin or glossy finish. Choose based on personal preference or match what’s already in your home. (We’re going for targeted touch-ups here!) If you don’t have leftover paint from your original job, remove a small piece of trim and take it to a paint store like Benjamin Moore at Ace Hardware. They’ll help match the exact color and finish. Be sure to stir the paint thoroughly before you begin.
-
Trim brush. For better control, I recommend a short-handled brush like Wooster or Purdy. They’re ideal for precision work when repainting trim in tight spaces.
-
Low-tack painter’s tape. I like IPG, but anything with gentle adhesion will work—just avoid tape that’s too sticky, or you risk peeling off wall paint. A quick trick: run the tape across your cotton t-shirt to make it less tacky before applying it to your walls.
-
Optional: Clear sealer. If your walls are a bold color like navy, red, or forest green, your paint edge needs to be flawless. To get that crisp line, apply your painter’s tape, then run a quick layer of clear sealer over the edge. That way, any seepage is clear, not trim paint.
Watch the Process in Action
Want to see how I do it? Watch my Facebook Live replay HERE for more tips and tricks on repainting trim the easy way. You’ll pick up a few insider techniques that make all the difference—especially if it’s your first time tackling trim!